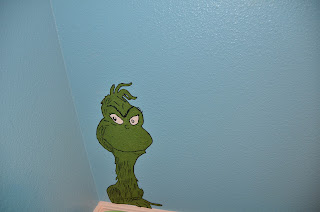
So here are some pics of the work in progress:
I made the wall murals by tracing them onto paint on wallpaper. I bought an EZ Tracer at Hobby Lobby ($19.99 w/ online coupon). I got the paint on wallpaper (has the orange peel texture to it) for $16.99 for 50 yards (I think, it was a huge roll) and the border paste for $5.99 at Lowe's. The acrylic paint was less than $1.00 on sale each at Hobby Lobby and the acrylic spray sealer came from Walmart for a few bucks. Overall, I spent less than $60 to do all the characters plus I have a ton of paper left over. You can find people selling these for close to $40 a piece for the good sized ones on ETSY. I thought I'd save the money and do them myself!
1. Tape a piece of wallpaper on the wall and print out the picture you want to trace.
2. Put it under tracer and trace with a pencil. I made sure the image was small enough I got the entire image in the box of the tracer and didn't have to move it around. Some images were a little blurry but I just drew it in as best I could.
3. Take off wall and paint. Then after it's dry, I went over all the lines with a sharpie.
4. Cut it out! After I cut it out I went back over the cut edges with the sharpie so you couldn't see any white. Spray with acrylic spray and let dry overnight.
5. When hanging them up, more is more! Coat that image good with the border clue, let sit a few minutes and then stick it up. Press around the edges good so they don't pop up. You may have to check it and push spots down as it dries.
I cut the sayings with SCAL and I used the Grinched font. You can dl it for free to use in SCAL. Just search google. Thanks for the sun and moon, Auntie Renee!
This is Charlotte's bedding I made. I got the fabric from Fabric.com and the pattern for the sheets from http://everythingyourmamamade.com/2008/02/06/crib-toddler-bed-sheet-tutorial/ and the pattern for the bumper pads with piping from http://lellaboutique.blogspot.com/2011/08/baby-bumper-pads-tutorial-giveaway.html. I just measured and sewed the ruffle and valance. I hit a really good coupon at fabric.com and was able to get enough fabric to make 2 complete bed sets for just over $200 with lots of extras. I can probably get a couple outfits out of the leftover fabric depending on how crazy I get with the quilts I'm going to make. I'm also going to make a chair pad to help cover the brown rocking chair. That chair was given to my Mother from my Granny that passed away recently. They rocked me in that chair and I have rocked both of my babies and my arms are aching to rock little Ruby in it. I'm also thinking of adding a dresser in front of the window.
Tim always brings back piggy banks from the places he travels. Charlotte's shelf is already filling up! The other 2 shelves will have the keepsake baby blocks I'm working on. I will post them when I'm done.
Kayla (11 years old) helped paint the Lorax!
All the sayings are cut with SCAL on removable vinyl.
Ruby's crib will go under her name when we get it.
The empty area will become the reading nook. I am going to add the characters from The Cat In The Hat Knows A Lot About That! on PBS. Charlotte loves the show!
I hope to work on it more after Halloween. I'm happy with the way it's turning out so far, and hope to finish it before before the girls grow out of it! I will post updates soon.


No comments:
Post a Comment